
In simple terms, the best photo restoration tools focus on reviving old photos. While physical photos can get torn, scratched, creased, or stained over time due to exposure to heat or sunlight, or water damage, digital photos too can suffer damage due to corruption, virus infection, incomplete file transfers, or bad sectors in storage drives. However, the current boom in technology means that these can be restored by up to 100% to their original state with easily available photo restoration tools that can restore corrupt or damaged photos, be they physical or digital. In this article, we are going to list some of the best software for photo restoration in the industry, read along… 6 Best Photo Restoration Tools List 1. Adobe Photoshop Adobe Photoshop CC is a top-notch photo restoration tool capable of tackling everything from eliminating stains, scuffs, and scratches to enhancing color accuracy, improving color vibrancy, and reducing noise in old photographs. This professional photo editing software offers an extensive array of tools to fine-tune color temperature, boost detail, correct color inconsistencies, and minimize grain in images. With the Clone Stamp tool, you can replicate pixels from undamaged areas of the photo to mend damaged sections, while the Object Aware Refine Mode effectively removes distracting elements. Additionally, the Photo Restoration Neural Filter, an optional downloadable feature, can automatically rejuvenate your old photos. 2. VanceAl Photo Restore VanceAI is one of the best tools where you can get a picture restored reliably and efficiently. This cutting-edge tool uses new-gen AI which can automatically colorize, reduce noise, and remove scratches from your old photos with remarkable precision. VanceAl Photo Restorer’s user-friendly interface makes it an immediate choice for both beginners and professionals alike. Moreover, it offers batch processing capabilities, saving you time and effort when working on multiple photos at once. And with its high-resolution output, you can be sure that your restored images will have a great quality. 3. Img Kits Another A1-powered photo restoration software on this list is lmg Kits. It specializes in repairing damaged and old photos with its advanced algorithms. It can also efficiently detect and remove scratches, blemishes, and other imperfections, resulting in a clean and clear image. Empowered with special automatic color correction features, it ensures that your restored photos have accurate and vibrant colors. lmg Kits is user-friendly for both amateur and professional photo restoration projects. With high-quality output and minimal artifacts, lmg Kits make a top choice in our books for anyone looking to restore their old photos. 4. AKVIS Retoucher This photo-editing software is specifically designed to restore old photos by effectively removing scratches, stains, tears, and other defects from damaged images. The software can even remove the date stamp, distracting elements, logos, and even big objects like cars in the background, etc. from photos. The AKVIS Retoucher tool can be used to reconstruct the missing parts of a photo by analyzing the information of the surrounding areas. 5. SoftOrbits Photo Retoucher SoftOrbits Old Photo Restoration Software is another great choice among photo restoration software for its remarkable capabilities in rejuvenating old, damaged, or faded images. Equipped with an array of advanced tools, it excels in automatically restoring damaged and worn-out photos, including scratches, creases, and blemishes. The program’s user-friendly interface and smart algorithms enable seamless object removal and color correction, giving a fresh look to vintage photographs. 6. Fotor Fotor is one of those companies that is available as a phone app, website, and desktop app and is known to be one of the leaders in the market when it comes to easy-to-use photo restoration software. Utilizing advanced algorithms, it can effectively remove scratches, dust, and other imperfections, bringing your old pictures back to life with minimal manual intervention. In addition to restoration, the tool provides robust capabilities for fixing contrast, color, and exposure issues commonly found in faded or washed-out photos. Beyond basic adjustments, the tool also allows for creative enhancements where users can add borders and text to personalize their photos, making them perfect for albums, frames, or sharing on social media. Where can I find the Best Photo Restoration Tools websites for restoring old photos online? Several reliable websites provide good photo restoration services. These websites allow you to upload your old photos and then edit them using various techniques such as color correction, dust and scratch removal, and image enhancement with the help of AI. Compatible with various image formats and offering batch processing capabilities, choose Picabees Photo Retoucher for professional-level photo restoration services to preserve the essence of your favorite memories and breathe new life into your old photos.

Choose the Best Real Estate Retouching Services Provider | 7 Must Key Factors To Consider
Getting professional-looking property photos is key to your real estate business success. Homeowners and business owners will be drawn to images that accurately represent the property on your website or brochures. High-quality photos also signal that you’re professional, trustworthy, and crucially, employing the best real estate retouching can ensure you find exactly what they’re looking for. You can hire a professional photographer, but that won’t be enough because no matter how good the shoot is, there will always be a need for the images to be retouched to make them look perfect for your customers. And hiring the best real estate retouching provider as important as hiring the best photographers. 7 Key Factors to Choose the Best Real Estate Retouching Provider 1. Turnaround time Time is money in the real estate industry. And you don’t want to be handing out your project to a company that will take forever to enhance your property photos, or worse, never give them back at all. To avoid this, make sure to ask what their usual turnaround time is, before handing over your project and also ask them why they take as long as they do. If you find them suspicious while answering questions around TAT, consider it a red flag. One more tip would be to give them a small size of pictures to edit before you give them the whole project to test their reliability. 2. Testimonials Fake customer testimonials are rampant in almost every online business today and the photo editing editing industry is no less. A way to test if the reviews are legitimate or not is If they only have 5-star reviews where every customer just boasts about them or they also have reviews where they are criticized in some ways. Of course, every business won’t be perfect but if the criticisms are reasonable you should go with them rather than some companies who post fake reviews to get clients. 3. Portfolio and Samples While plenty of professional photo editing companies claim that they are good at all sorts of things and real estate photo editing being one of them, they might be false advertising. That’s why one of the most important steps in selecting them is to thoroughly review their portfolio because it provides you a glimpse into the company’s style, skill, and quality of their work. In addition to reviewing their portfolio, don’t forget to ask if they can provide a few samples and this is a vital step in the process. Let’s say you have specific requirements or a unique property to showcase, by requesting samples, you can get a sense of how the company might handle your specific needs. 4. Affordable Prices Affordability might be a subjective term because everyone has a different budget depending on what their requirements are. However, in the context of real estate photo editing companies, prices are in a similar range. Prices for the standard set of editing real estate images must range between $1-$3 on average, not more, not less. Other services that require additional time and effort may be charged more, but these will normally be the more complex requests. 5. Respects Privacy Confidentiality and trustworthiness of the company are vital when forging a partnership. Make sure to do some background checks on them if possible. Also, keep an eye out to make sure they aren’t selling your photos to someone else for a price. 6. Technology they Use Keeping up with the technological changes is important for any company that is into providing High-quality photo editing services, but there might be some who use obsolete technology to reduce their cost. It’s important to filter them out so you can get the best of what you want instead of making compromises. As technology advances with innovative features being added every other day in some way or another, you need to go with the company that welcomes these changes so you can get the best output for your money’s worth. 7. Approach to Style Some of the best outsourcing real estate photo editing services can provide top-notch quality because of their ability to bring out great enhancements. But if you are looking for small changes without the need for many enhancements then this would likely be a less tight factor for you, but if you need a certain style to stand out from your competitors, then the skill-set of the editors to replicate your style matters. Not all service providers will be able to tailor fit your requirements perfectly, but some out there strongly commit to every instruction you give them and can execute them flawlessly, these are the ones you should go with and one of them is Picabees. Final Conclusion Choosing an established player in the industry can be difficult and expensive unless you go with someone who can meet your real estate photo editing needs and deliver on time while keeping your budget needs in check. That someone could be us — Picabees. As a B2B photo retouching services company with over 7 years of experience, we can truly help your brand come out on top.
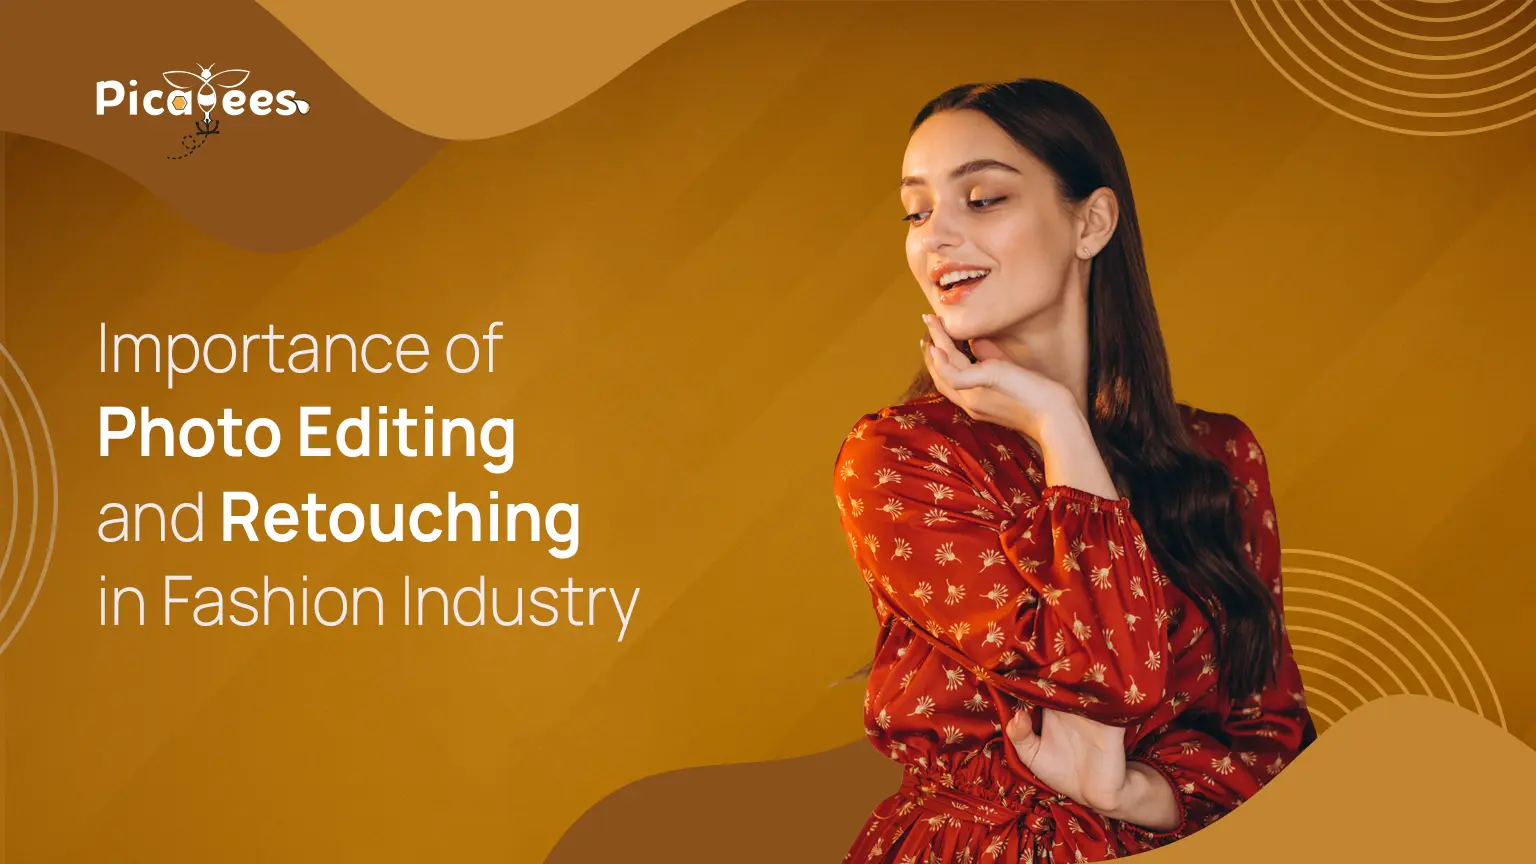
Why Photo Editing In Fashion Photography is MUST?
Photo editing in fashion photography is like salt for a dish: you only need a pinch of it and it makes all the difference. But too much of it and the dish goes bad. While retouching images in the glamour industry is quite a common practice, it must be done in an ethical manner. Meaning, retouching should highlight the visual appeal of the images but at the same time, it shouldn’t diverge far from reality while doing so. Whether you’re a fashion company, designer, photographer, stylist, or model — photo retouching offers you an amazing opportunity to optimize your photos to visually enticing your prospects to buy more. What does photography retouching actually mean? In simple words, the process of retouching is nothing but the removal of undesired elements in a photo. Basic retouching methods in the fashion industry include color correction, skin retouching, blemish removal, background removal and detail enhancement . One of the most popular software programs used to edit images is Adobe Photoshop. Key benefits of photo editing in fashion photography. Visual Appeal As you can see for yourself, the unedited version of the image looks bland and unexciting when compared side-by-side with a professionally edited image. Brand Identity It is absolutely necessary to keep a consistent brand identity across all marketing and communications and retouching can be beneficial in doing the same, colored backgrounds, custom margins, unique approach to shadows – all of these elements can play towards your brand awareness. Bridge the online and offline gap Photo Editing helps in enhancing images and maintaining image quality even when they are zoomed-in, giving shoppers an opportunity to almost feel the fabric and see closeups of a product. Cost Savings and Sustainability Setting up a standard editing process for your company according to your brand attributes can help eliminate extra effort and costs that come with editing hundreds of images. This can be done more efficiently when you outsource your image editing requirements to an expert photo editing company, such as Picabees. Improving Ecommerce Conversion Rates It is estimated that approximately 70% of online buyers place image quality as the most important aspect of their buying decision. Photo retouching is a key enabler in making images look good and attractive, thereby persuading customers to purchase more often. Here are some common photo editing and retouching techniques Color Correction and Enhancement Color correction involves adjusting brightness, contrast, and exposure to achieve optimal lighting, creating a well-balanced and harmonious image. Additionally, fine-tuning color balance, saturation, and vibrancy ensures a cohesive color palette that conveys the intended mood and atmosphere. Background Removal One of the most important aspects of photo editing in fashion photography is the removal and addition of backgrounds, your requirements might sometimes need that the same image be added against different backgrounds to suit the medium that they are being posted. For example – The backgrounds of images might vary when you post it on your website against posting it on a third-party e-commerce site that has certain restrictions regarding background colours. Skin Retouching Skin retouching is another important area of focus for the fashion industry, skin conditions like acne, scars, tattoos can easily be edited out to suit your requirements, hence allowing you to hire models that match your brand’s identity without having to worry about minor skin features. Detail Enhancement and Sharpening It is vital to make fashion photos as realistic as possible, both models and their accessories you or your company is trying to promote. While sharpening techniques helps maintain a natural-looking appearance of the model. Enhancing fine details and adding textures to products in the images, adds clarity and definition to the entire picture. Manipulation It is nothing but adding depth and dimensionality to the image by replacing backgrounds or incorporating new elements. This is especially important conjuring the fact that actual images are taken in 3-D while the actual output is supposed to be in 2-D. This is where true editing mastery comes into play, to make sure the fashion photos look as authentic as possible to the customer’s eye. As you might have read, this is a big list of services and they can all become an intimidating task and really expensive unless you choose an established service provider who is able to effectively meet all your needs under one roof while keeping your budget needs in check. That someone could be us —- Picabees. With our decade+ years of experience in the fashion photo editing industry, we can truly help your brand establish itself and come out on top.

What is Product Image Shadows & its Types, Benefits and Uses
Imagine this, you went to a nice restaurant on a lovely Saturday evening with your partner and while you wait for your order, you notice the beautiful yellow light falling on the glass water bottle and think how pleasing it is to look at, even if it’s so simple. And if you looked closer, you would’ve noticed a shadow of the same water bottle on the table which makes the scene look all the more picturesque. Now this is what shadows do when customers are browsing through your product photos online too, they bring in a sense of reality and help customers get an accurate perception of what the product would look and feel like if they had it in real life. 3 Reasons Why Product Image Shadows Matter in Photography Should product photos have shadows? YES! The difference between adding an OK image versus adding a pleasing life-like realistic image yields a 30% difference in conversions. 1. Makes products look more natural As you can see in the shadow-less image above, it does look off, and kind of odd. After giving it a shadow – it becomes 3-dimensional and true-to-life. 2. Improves UX/UI experience When products line up in neat rows on a product page, it provides for a better user experience for the potential customers sitting behind the screen. 3. Drives credibility and improves conversion drastically 90% of customers see quality photography as the most vital aspect of online sales because, at a subconscious level, people are attracted to things with symmetric, well-balanced images. Product image shadows – are they necessary? Definitely not. They are not necessary, instead an accessory that completes the product photos by giving it the final touch it needs to look realistic on the website. Types of Shadows you can add to your product photography portfolios How the shadow looks depends entirely on the surface of the object and also the quality of the light. 1. Natural shadows It’s the type of product image shadows that is created when you use one source of light falling onto a subject and the natural shadow is then cast onto the surface behind the product. Natural shadows mostly rely on the skill of the photographer and his ability to use the lighting in the best way possible. But the problem here is that not every product is suitable for this type of shadow, because they differ in size, shape, and form. 2. Drop Shadows Drop shadows, primarily used for furniture or shoe photography. This type of product image shadows is designed to replicate the shadow from the sun shining above – so the shade is directly under the object. When used for furniture, it helps to bridge the gap between offline and online and creates a feeling of being placed on the floor. This allows the customer to picture the piece on their floors and tables. 3. Reflection Shadows As the name suggests, these are a type of shadows where an object is being reflected from the glossy surface. Widely used when it comes to showcasing luxury products such as jewelry items, and products that have a reflective surface such as perfume bottles. Skin products and eyewear photography are other areas where this technique of adding reflecting shadows is used extensively. While adding natural shadows is more of a pre-editing process that happens during a shoot, drop shadows and reflection shadows are post-shoot processes that fall in the hands of expert designers who can make product images stand out with their photo-editing skills. 4. Product Photography Shadows = Better Sales The benefits of product image shadows making for photography are long-lasting — they help maintain the consistency of your product images throughout marketplaces, your website and social media platforms. This in turn increases the credibility of your company in the customer’s mind, leading to much higher CTRs and conversions. If you are looking for a product photo vendor, with the expertise to translate every bland commercial image into a visual treat – COMMISSION ADDING PRODUCT SHADOWS TO PICABEES. We have made shadows for 90+ brands, but we will treat yours as if you were our first and only client.
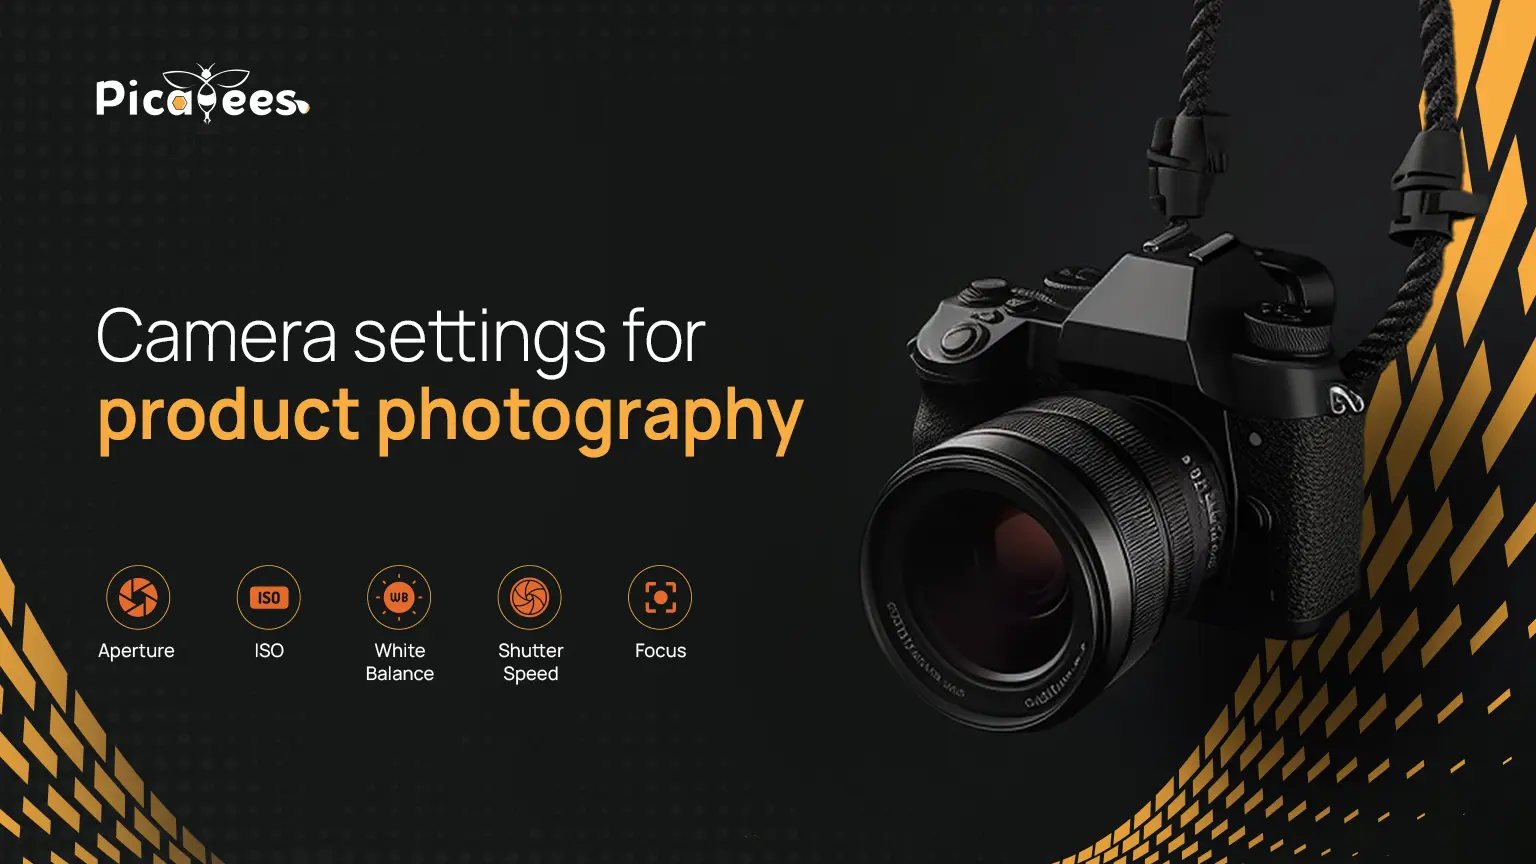
7 Best Camera Settings For Product Photography To Learn A Newbie in 2024
The best kind of product photography can accentuate a product’s value to more than what it’s worth, helping business owners increase their earning potential, and thus, making product photography a lucrative career opportunity. But like any career that pays well, it comes with a learning curve, and understanding the tricks of the trade can help you find the clients you’re looking for. While there are many things to master before you break into your dream clientele work, one thing you need to master early on is your ideal camera settings for product photography. In this post, we’ll take you through: 7 best camera settings for product photography 1. Manual mode It’s tempting to let the camera automatically handle important exposure settings like ISO, aperture (F-stop), and shutter speed but did you know that the best way to shoot is in manual mode? Manual camera settings for product photography are always the best foot forward because unlike automatic mode, where the camera makes certain decisions for you, manual mode allows you to control the preferred aperture, shutter speed, and ISO. Perfecting these three settings known as the ‘exposure triangle’, is easily one of the fastest ways to improve your product photography game. 2. ISO ISO stands for International Standards Organization and is the sensitivity of the camera to light. The lower the number, the better. A lower number also means it’s less sensitive, and will take you more time to take the shot. You can always increase ISO if you’re shooting in a low-light situation or want to use a faster shutter speed. But this comes with an inherent cost where your images can have a lot of noise and hence, a grainy appearance. An ideal ISO setting is somewhere between 200-800 when you’re working with direct natural light. And, when you’re working with artificial light, that will change the ISO requirements, giving you more control over the settings. 3. Optimal Shutter Speed When it comes to product photography, you’re almost always shooting a still shot with the object in front of you. It’s advisable to use a low setting like 1/13, to push more light into the camera because you don’t have to worry about motion blur or camera shake. You might be wondering,” What is shutter speed?”. Shutter speed (also known as “exposure time”) is basically how fast your camera’s shutter opens and closes. This in turn, also determines your camera sensor’s ability to capture the light needed when taking a photograph. Shutter speeds are calculated in fractions of seconds. And faster shutter speeds mean the object is mostly frozen, while slower speeds can create motion blur. However, If you’re shooting a model or landscape, sports, or nature, you may need to increase your shutter speed to compensate for motion. 4. Preferred Aperture Apertures in the camera are like the pupils in your eyes: it is the opening that allows the light in. The greater the opening of the aperture, the more the light comes in, and vice versa. Another function of it is that it also determines the depth of field of your shot. Depth of field refers to the area of the scene that is well-focused. Aperture is usually measured in f-stops and it ranges between 1-22. The smaller the number, the larger the aperture. So, f/2.6 has a larger aperture opening than f/13, meaning more light is getting in with f/2.6 versus having it on f/13. For product photography, you can use a setting from f/4.5 to f/7 when the background is either black or white. Biu when you don’t have a plain background and much separate the object in focus from its surroundings, a wider aperture (f/2.8 or lower) will help blur everything that’s not needed within the area you focused on. The aperture setting is also interconnected with shutter speed and ISO. 5. White Balance It’s ideal to set up your photo studio in a place where there is an opportunity for direct sunlight to make an impact. As you know, nothing beats natural light when it comes to taking good photos. However, it’s extremely important to make sure that harsh, direct sunlight isn’t affecting your shoot. To tackle this, you can drape a white curtain or sheet over your window to diffuse the light, creating a more even light for your product photography shoots. Since you can’t control the sun, you must know how to work around it and that’s why understanding how to set your white balance is key to ensure that all the blacks and whites are rendered correctly in your product photos. There are two most commonly used ways to adjust the white balance. Most cameras have an “Auto” white balance setting, which often works fine. But sometimes, your camera too can get confused when your scene doesn’t have enough white color or is close to it. So when your scene is illuminated by multiple sources and contains colors of different temperatures, you’ll need to adjust the white balance settings yourself. A white balance card can most definitely help you manually adjust your white balance. Here’s a short guide on how to set it manually – take a picture of something white or mid-gray in the same light that is illuminating your product. Then, you simply tell the camera to use that image as a reference to set the white balance. You can do that by choosing “Custom WB” from the menu and pressing the set button. That’s when the camera shows you the last photo you took, select that by pressing “SET.” 6. No Flash Never use flash when you’re taking a professional commission, flash lighting creates certain challenges for exposure, and it often creates uneven and hard lighting on the product. But in an uncontrollable situation where using it is a must, use off-camera flash equipment rather than the on-camera flash. Again, if you can completely avoid using a flash, that’s best. 7. Zoom Most cameras usually have only two zoom choices: optical and digital. It’s best to not use
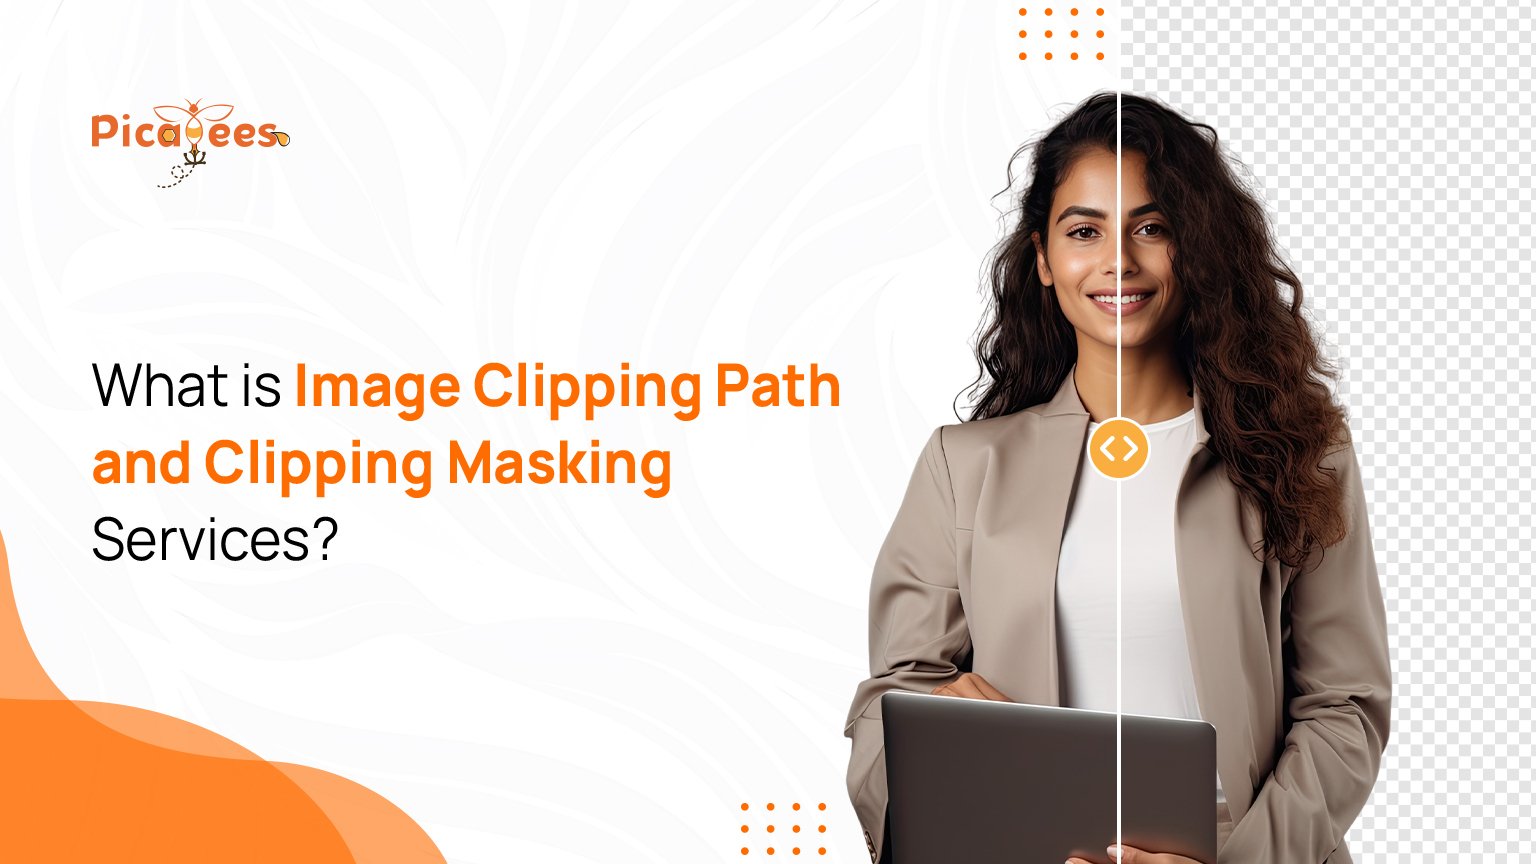
What is Clipping Path? Everything You Need to Know
In the world of photo editing and graphic design, precision and attention to detail are paramount. Whether you’re a photographer, an e-commerce business owner, or a marketing professional, achieving crisp, clean images is essential for making a lasting impression. One indispensable tool in the arsenal of image editing techniques is the clipping path. In this comprehensive guide, we’ll unravel the intricacies of clipping path services, explore its advantages, and shed light on its applications across various industries. What is a Clipping Path on an Image? At its core, a clipping path is a closed vector path or shape that outlines a specific region within an image. This path, typically created using specialized software like Adobe Photoshop, serves as a digital stencil, delineating the areas that should be retained or removed from the image. By defining the boundary between the subject and its background, a clipping path enables precise selection and manipulation of individual elements within an image. Clipping Path vs. Image Masking: Understanding the Difference While both clipping path and image masking techniques are employed to isolate subjects from their backgrounds, they differ in their approach and applications. Clipping path involves creating a precise outline around the subject using vector paths, making it ideal for images with well-defined edges and solid backgrounds. On the other hand, image masking entails the use of layer masks or alpha channels to selectively hide or reveal portions of an image based on luminance or color values. Image masking is preferred for images with intricate details, soft edges, or complex backgrounds that cannot be accurately delineated using a clipping path alone. Advantages of Clipping Path Services The benefits of utilizing clipping path services are manifold, particularly for businesses and individuals seeking to enhance the visual appeal and professionalism of their images. Some of the key advantages include: Background Removal: Clipping path services enable seamless removal of backgrounds, allowing the subject to be placed against any desired backdrop or integrated into various design compositions. Precision Editing: By precisely outlining the subject using a clipping path, editors can make targeted adjustments to color, contrast, and other attributes without affecting surrounding elements. Consistent Branding: For e-commerce retailers and businesses, maintaining a consistent visual identity across product images is crucial for brand recognition and customer trust. Clipping path services ensure uniformity in product presentation by standardizing backgrounds and visual elements. Enhanced Product Presentation: By eliminating distractions and clutter from images, clipping path services draw focus to the subject, resulting in cleaner, more impactful product presentations that resonate with customers. Time and Cost Efficiency: Outsourcing clipping path services to professional editing companies like Picabees allows businesses to streamline their workflow, reduce editing time, and optimize resource allocation, ultimately leading to cost savings and improved productivity. Can a PNG Have a Clipping Path? Yes, PNG (Portable Network Graphics) images can indeed have clipping paths. In fact, PNG format supports transparency, making it particularly well-suited for images with complex backgrounds that require precise masking or clipping. By incorporating a clipping path into a PNG image, editors can achieve crisp, high-quality results while preserving transparency for seamless integration into various design projects. Who Needs Clipping Path Services? The demand for clipping path services extends across a wide range of industries and professions, including: E-commerce Retailers: Online retailers rely on high-quality product images to showcase their merchandise effectively and attract potential buyers. Clipping path services are indispensable for creating clean, professional product photos with uniform backgrounds. Photographers: Professional photographers often require precise editing tools to refine and enhance their images. Clipping path services enable photographers to isolate subjects, adjust compositions, and achieve the desired visual impact. Graphic Designers: Graphic designers leverage clipping path techniques to create compelling visual compositions, advertisements, and marketing materials. Whether it’s designing brochures, flyers, or web graphics, clipping path services play a vital role in achieving polished, professional results. Marketing Agencies: Marketing agencies tasked with promoting products or services across various channels rely on visually engaging content to capture audience attention. Clipping path services enable marketers to create eye-catching advertisements, social media graphics, and promotional materials that resonate with their target audience. Unlock the Potential of Clipping Path Services with Picabees At Picabees, we specialize in providing premium clipping path services tailored to your specific needs. Our team of experienced editors possesses the expertise and precision required to deliver flawless results, ensuring that your images stand out for all the right reasons. Whether you’re an e-commerce retailer, a photographer, or a marketing professional, we’re here to help you elevate your visual content and achieve your goals. Learn more about our clipping path services here. Don’t let mediocre images hold you back. Contact Picabees today to explore how our clipping path services can transform your visuals and elevate your brand presence. Contact us now to unleash the full potential of your images with expert clipping path services! In conclusion, clipping path services offer a versatile and powerful solution for enhancing the visual appeal and professionalism of your images. By understanding the fundamentals of clipping path techniques and leveraging the expertise of professional editing services like Picabees, you can unlock the full potential of your visuals and make a lasting impression on your audience.

Avoid These 5 Biggest Real Estate Photo Editing Mistakes 2024
In the dynamic realm of real estate, where first impressions often make or break a sale, the significance of aesthetically-looking property images cannot be overstated. With the proliferation of online property listings, captivating visuals play a pivotal role in attracting potential buyers and standing out amidst the competition. However, even with the advent of advanced photo editing tools and techniques, real estate professionals frequently encounter pitfalls that undermine the efficacy of their marketing efforts. In this article, we’ll delve into the Top 5 Real Estate Photo Editing Mistakes and provide insights on how to rectify them, ensuring your listings radiate professionalism and allure. How do Realtors Edit Photos? Before delving into the common mistakes, let’s briefly explore the process of real estate photo editing. Realtors employ various tools and software applications to enhance the visual appeal of property images. These tools allow for adjustments in lighting, color balance, contrast, and perspective correction, among other aspects, to ensure that the photographs accurately represent the property’s features and ambiance. Moreover, skilled real estate photo editors possess the acumen to highlight the property’s unique selling points while minimizing any imperfections. Making Real Estate Photos Look Professional The key to making real estate photos look professional lies in meticulous attention to detail and adherence to advanced photo editing techniques. By employing high-quality editing software and leveraging expert knowledge, real estate professionals can transform ordinary images into captivating visual masterpieces. Professional editing enhances the clarity, vibrancy, and overall aesthetics of property images, thereby leaving a lasting impression on prospective buyers and compelling them to explore further. Major Benefits of Photo Editing The benefits of photo editing in the realm of real estate are multifaceted. Firstly, it elevates the perceived value of the property by presenting it in the best possible light, both literally and figuratively. Secondly, it facilitates effective storytelling by accentuating the property’s unique features and ambiance. Additionally, professionally edited images command attention in a crowded online marketplace, thereby increasing engagement and potential leads. Ultimately, investing in expert real estate photo editing services yields a substantial return on investment by expediting the sales process and maximizing property value. Real Estate Photo Editing Mistakes and How to Correct Them Over-Saturation and Over-Editing: One common mistake is excessive editing, resulting in oversaturated colors and artificial-looking images. To rectify this, exercise restraint in editing and strive for a natural and balanced appearance. Poor Composition and Cropping: Incorrect composition and improper cropping can detract from the property’s appeal and distort its proportions. To address this, adhere to the principles of composition, such as the rule of thirds, and ensure that the property is showcased in its entirety without unnecessary distractions. Inconsistent Lighting: Inconsistent lighting can create shadows and highlights that obscure important details or distort the perception of space. To mitigate this issue, use HDR imaging techniques or bracketed exposures to capture the full range of light and shadow accurately. Ignoring Perspective Correction: Failing to correct perspective distortion can make rooms appear skewed or irregular, undermining the overall presentation of the property. Utilize perspective correction tools to straighten vertical and horizontal lines and maintain visual coherence. Overlooking Minor Blemishes: Neglecting to address minor blemishes or imperfections can diminish the perceived quality of the property and erode buyer confidence. Prioritize thorough editing to remove distractions and present the property in its best possible condition. Real Estate Photo Editing Tools and Technology A plethora of advanced photo editing tools and technologies are available to streamline the real estate photo editing process. From industry-standard software like Adobe Photoshop and Lightroom to specialized real estate editing software such as Photomatix and PTGui, real estate professionals have access to a diverse array of tools tailored to their specific needs. Moreover, advancements in artificial intelligence and machine learning have revolutionized the editing process, enabling automated enhancements and intelligent adjustments with unprecedented precision and efficiency. What is the Best Angle for Real Estate Photography? The best angle for real estate photography varies depending on the property’s layout, features, and architectural style. However, as a general rule, capturing wide-angle shots from eye-level or slightly above tends to provide a comprehensive view of the space while minimizing distortion. Additionally, incorporating strategic angles and perspectives can highlight the property’s unique selling points and evoke a sense of depth and dimensionality. Hire the Best Real Estate Image Editing Company and Benefits of Hiring Us In conclusion, avoiding common real estate photo editing mistakes and embracing advanced editing techniques is essential for maximizing the visual impact of property listings and attracting prospective buyers. At Picabees, we specialize in providing expert real estate photo editing services tailored to your specific requirements. With our team of skilled editors and cutting-edge editing tools, we ensure that your property images exude professionalism, quality, and visual allure. Elevate your property listings with Picabees and unlock the full potential of your real estate marketing endeavors. Learn more about our expert real estate photo editing services here. By entrusting your real estate photo editing needs to Picabees, you can rest assured that your property images will captivate and enthrall audiences, driving engagement, leads, and ultimately, sales. Contact us today to learn more about how we can enhance the quality and impact of your property listings. Elevate your property listings with expert real estate photo editing services!

9 Real Estate Photo Editing Techniques For Property Listings
In the real estate hustle, fantastic visuals matter. As you scroll through online property listings, striking images grab attention and drive clicks. That’s where real estate photo editing techniques for property listings come into play. At Picabees, we know the magic of enhancing images to make your properties irresistible. Join us in this blog as we uncover nine key techniques of Real Estate Property Image Editing to heat up your property listings and boost your sales up to 3x. 1. High Dynamic Range (HDR) Imaging HDR imaging is a game-changer in real estate photography. By combining multiple exposures of the same scene, HDR Image editing produces images with enhanced detail, depth, and color accuracy. This technique ensures that both interior and exterior features are beautifully showcased, even in challenging lighting conditions. 2. Perspective Correction To showcase the true potential of a property, it’s crucial to ensure that vertical and horizontal lines are perfectly aligned. Perspective correction eliminates distortions caused by wide-angle lenses, presenting rooms and architectural elements in their true proportions. This technique enhances the overall aesthetic appeal and professionalism of your listings. 3. Color Correction and Enhancement Colors play a significant role in evoking emotions and influencing buyer perceptions. Our real estate photo editing services include color correction and enhancement to ensure that every room radiates warmth and vitality. From adjusting white balance to enhancing saturation, we fine-tune colors to create inviting and visually appealing spaces. 4. Virtual Staging Empty rooms can appear cold and lifeless in photographs, failing to convey the full potential of a property. Virtual staging breathes life into vacant spaces by digitally adding furniture, decor, and accessories. This allows potential buyers to envision themselves living in the space, making it easier for them to connect emotionally with the property. 5. Sky Replacement A dreary sky can dampen the overall impact of your property photos. Sky replacement allows us to replace overcast skies with vibrant blue skies or dramatic sunset backgrounds. This simple yet effective technique instantly enhances the visual appeal of outdoor shots, making them more inviting and captivating. 6. Object Removal Unsightly elements such as power lines, clutter, or blemishes can detract from the beauty of a property. Our real estate photo editing experts employ advanced techniques to seamlessly remove unwanted objects and distractions from images, ensuring a clean and polished presentation. 7. Twilight Editing Twilight photography exudes a magical charm and highlights the architectural features of a property. Through skilled editing techniques, we can transform daytime shots into stunning twilight images that captivate viewers and set your listings apart from the competition. 8. Virtual Tour Enhancement Virtual tours offer potential buyers an immersive experience, allowing them to explore properties from the comfort of their homes. Our real estate photo editing services include enhancing virtual tours with interactive features, professional narration, and music, creating a memorable and engaging showcase for your listings. 9. Drone Photography and Editing Aerial photography provides a unique perspective and allows prospective buyers to gain a comprehensive understanding of the property’s surroundings. Our drone photography and editing services capture breathtaking aerial views and enhance them to perfection, giving your listings a competitive edge in the market. Why Real Estate Photo Editing Techniques Matters In today’s digital age, where online platforms dominate the real estate market, visually appealing images are essential for grabbing attention and generating interest. Studies have shown that professionally edited photos not only attract more views but also lead to faster sales and higher selling prices. By investing in real estate photo editing services, you demonstrate a commitment to quality and professionalism, instilling confidence in potential buyers and maximizing the value of your properties. Comparison of Sales Increase According to industry statistics, properties with professionally edited photos sell faster and at higher prices compared to those with amateurish images. In fact, some studies have reported an increase in sales prices ranging from 3% to 10% for listings with high-quality photos. Additionally, properties with virtual staging have been shown to sell up to 73% faster than vacant properties. How Real Estate Photo Editing Services Help Sell Properties: Attract More Buyers: Professionally edited photos grab attention and entice potential buyers to explore your listings further. Highlight Property Features: Editing techniques such as HDR imaging and virtual staging highlight the unique features and selling points of your properties. Create Emotional Connections: Stunning visuals evoke emotions and help buyers envision themselves living in the space, prompting them to take action. Stand Out from the Competition: High-quality images set your listings apart from the competition and position your properties as desirable and valuable investments. Conclusion In the competitive world of real estate, first impressions matter. By harnessing the power of real estate photo editing techniques, you can transform ordinary listings into extraordinary showcases that captivate buyers and drive sales. At Picabees, we specialize in delivering exceptional image enhancement solutions tailored to your specific needs. Elevate your property listings and maximize your selling potential with our professional real estate photo editing services.

Do Watermarks Protect Photos in 2024? What You’re Missing!
In the world of digital photography, there’s a big debate: Do watermarks protect photos? It’s a question that keeps photographers and enthusiasts chatting. But do those faint logos really stop others from swiping or messing with our favorite snapshots? Let’s explore the ins and outs of watermarks and find out if they’re truly our photo superheroes. Understanding Watermarks A watermark is essentially a visible overlay, often a logo or text, superimposed onto an image to assert ownership or provide copyright information. Initially employed by paper manufacturers to identify their products, watermarks found their way into the digital landscape as a means of protecting intellectual property. The Disadvantages of Using Watermarks While watermarks serve the purpose of asserting ownership, they come with their own set of drawbacks. Firstly, they can distract from the aesthetic appeal of the image, diminishing its aesthetics. Moreover, skilled individuals can easily remove or obscure watermarks using various software tools, rendering them ineffective in deterring copyright infringement. Why Do Photographers Watermark Their Photos? Photographers resort to watermarking as a precautionary measure against unauthorized usage of their work. By imprinting their signature or logo onto the image, they aim to assert ownership and deter potential infringers. Additionally, watermarks can serve as a branding tool, promoting the photographer’s name or studio across different platforms. When Should a Photographer Not Use a Watermark? While watermarking may seem like a foolproof method of protection, there are instances where it may not be necessary or advisable. For example, in situations where the primary goal is to showcase the artistic merit of the photograph, such as in galleries or exhibitions, watermarks can detract from the viewer’s experience. Similarly, when sharing images with trusted individuals or clients, overly conspicuous watermarks can come across as distrustful or unprofessional. Do Watermarks Really Protect Photos From Theft? One of the burning questions surrounding watermarks is their efficacy in preventing image theft. Unfortunately, the reality is far from ideal. Despite their presence, watermarks do little to deter determined individuals from misappropriating images. With the proliferation of advanced editing software, removing or altering watermarks has become a trivial task for tech-savvy users, making them an unreliable form of protection. Do Professional Photographers Use Watermarks? While some professional photographers opt for watermarking as a precautionary measure, others choose to forego this practice altogether. The decision often boils down to personal preference and the specific context in which the images will be shared or distributed. Established photographers may rely on their reputation and legal recourse to safeguard their work, rather than relying solely on watermarks. The Pros and Cons of Watermarks on Photographs Pros: Assert ownership and copyright information. Serve as a branding tool for photographers. Provide a visual deterrent against casual infringement. Cons: Distract from the aesthetic appeal of the image. Easily removable by tech-savvy individuals. Can convey a sense of distrust or unprofessionalism in certain contexts. Alternate Solutions Given the limitations of watermarks in safeguarding photos, photographers may explore alternative strategies for protecting their intellectual property. These include: Metadata Embedding: Embedding copyright information and ownership details directly into the image’s metadata. Digital Rights Management (DRM): Implementing DRM technologies to control access and usage rights of digital content. Legal Measures: Enforcing copyright laws and pursuing legal action against infringers when necessary. Conclusion In conclusion, while watermarks may offer a semblance of protection for your photographs, they are by no means foolproof. Understanding their limitations and exploring alternative solutions is essential for safeguarding your intellectual property in the digital age. Whether you choose to watermark your images or not, remember that vigilance and proactive measures are key in preserving the integrity of your work. For professional and comprehensive image editing services that complement your photography endeavors, explore Picabees’ range of offerings today! Learn more about our Image Editing Services. In the ever-evolving landscape of digital photography, staying informed and adaptable is paramount. Let your creativity shine, and may your images continue to inspire and captivate audiences worldwide, watermark or not.

Types of E-Commerce Product Image Editing Your Business Needs in 2024
In the world of online selling, good pictures are super important. When people shop online, they really care about how things look. Having great pictures can make people want to buy stuff from you. But making pictures look amazing isn’t easy. That’s where understanding of right Types of E-Commerce Product Image Editing comes in. It’s all about making your pictures look the best they can be. It helps your products stand out and makes people more likely to buy them. Professional e-commerce photo editing is like a secret weapon for online sellers. It helps them succeed by making their pictures awesome. What is eCommerce Image Editing? E-commerce image editing encompasses a range of techniques and processes aimed at enhancing the visual aesthetics of product photographs to attract potential buyers and drive sales. From background removal to color correction and image resizing, these edits are meticulously crafted to highlight the best features of your products while maintaining a consistent brand aesthetic. Benefits of Professional eCommerce Photo Editing Investing in professional e-commerce photo editing yields a plethora of benefits for online businesses: Investing in professional e-commerce photo editing yields a plethora of benefits for online businesses: 1. Enhanced Visual Appeal: Professional editing elevates the overall visual appeal of your product images, making them more enticing to prospective buyers. 2. Consistent Branding: By ensuring uniformity in editing style and branding elements across all product images, professional editing helps reinforce your company’s brand identity and fosters brand recognition. 3. Increased Conversions: Studies have consistently shown that high-quality images significantly impact purchase decisions, leading to higher conversion rates and increased sales. 4. Improved SEO: Optimized images with appropriate alt text and metadata can improve your website’s visibility on search engine results pages, driving organic traffic to your online store. Types of E-Commerce Product Image Editing Here are the most important types of Photo editing you need for your e-commerce business photoshoot to stand out from the crowd: 1. Background Removal: Removing distracting backgrounds and replacing them with solid colors or transparent backgrounds allows your products to take center stage, enhancing their visual appeal and making them more versatile for use across various marketing channels. 2. Color Correction: Adjusting colors, brightness, contrast, and saturation ensures that your product images accurately represent the true colors of your products, enhancing their attractiveness and appeal to customers. 3. Image Resizing: Resizing images to fit the dimensions of your website or specific marketing platforms optimizes loading times and ensures a seamless user experience across devices, reducing bounce rates and increasing engagement. 4. Image Retouching: Eliminating imperfections, blemishes, or reflections on product surfaces enhances their perceived quality and creates a more polished and professional appearance, instilling confidence in potential buyers. 5. Shadow Creation: Adding realistic shadows to product images creates depth and dimension, making them appear more lifelike and visually appealing, thereby increasing their perceived value to customers. Why Choose Picabees for Your E-commerce Photo Editing Needs? At Picabees, we understand the critical role that high-quality images play in the success of your e-commerce business. With a team of skilled professionals and cutting-edge editing techniques, we specialize in delivering exceptional results that exceed your expectations. Here’s why you should trust us with your e-commerce photo editing needs: 1. Unrivaled Expertise: With over 8 years of experience in the field of e-commerce photo editing, our team possesses the expertise and insight to transform ordinary product images into captivating visual assets that drive sales and elevate your brand. 2. Tailored Solutions: Every e-commerce business is unique, which is why we offer personalized editing solutions tailored to your specific requirements, ensuring that your product images effectively communicate your brand’s unique value proposition. 3. Streamlined Workflow: Our efficient workflow and quick turnaround times ensure that you receive professionally edited images promptly, allowing you to maintain a consistent and visually appealing online presence without unnecessary delays. 4. Exceptional Quality: We take pride in delivering high-quality editing services that adhere to the highest standards of excellence, ensuring that your product images stand out from the competition and leave a lasting impression on your target audience. In conclusion, professional e-commerce photo editing is an indispensable tool for online retailers looking to enhance the visual appeal of their products, drive conversions, and maximize their e-commerce potential. By partnering with Picabees, you can unlock the full potential of your product images and achieve unprecedented success in the competitive world of e-commerce.